
Introduction
This guide will walk you through setting up IPv6 on your VPS instances using Hurricane Electric's free Tunnelbroker service.
Preparation
Start by creating an account on the Tunnelbroker website. Once registered, click the "Create Regular Tunnel" button on the left side of the Tunnelbroker portal. Enter your VPS instance's IP address in the IPv4 Endpoint field and choose a tunnel server from the list. Then, in your VPS control panel (OpenStack Horizon under "Access & Security"), adjust your Security Groups to allow all TCP traffic from the Tunnel Server's IPv4 address, as listed on the Tunnelbroker "Tunnel Details" page.
Connecting
With your tunnel set up, you can now connect to it. SSH into your VPS instance and open the /etc/network/interfaces file using:

If nano isn't installed, use the following command to install it:

Add the following configuration at the end of the file:
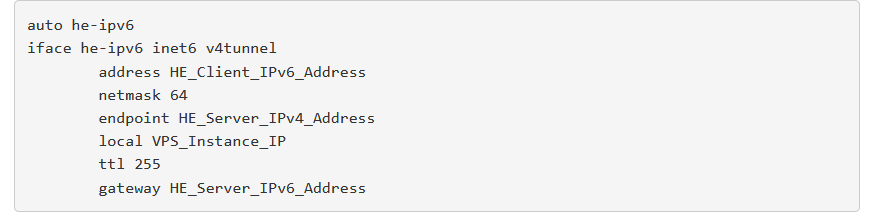
Replace HE_Client_IPv6_Address, HE_Server_IPv4_Address, and HE_Server_IPv6_Address with the relevant details from your Tunnelbroker "Tunnel Details" page, and VPS_Instance_IP with your VPS instance's IPv4 address. To activate the he-ipv6 interface, run:

Your instance should now have IPv6 connectivity! The IPv6 address for your instance will be the "Client IPv6 Address" displayed on the Tunnelbroker "Tunnel Details" page. For troubleshooting or additional information about Tunnelbroker, refer to the Tunnelbroker section of the Hurricane Electric IPv6 FAQ.