For enhanced security, it's advisable to use SSH keys rather than passwords for server access. SSH keys are significantly more secure, as they are nearly impossible to decrypt, unlike passwords that can be compromised through brute-force attacks. Additionally, SSH key authentication is more convenient, allowing you to connect to one or multiple servers without the need to remember and enter your password each time.
1. Generating SSH Key Pairs
SSH keys come in pairs: a private key and a public key. The private key must be kept secure and private, while the public key can be shared with servers you wish to access.
Generating SSH Keys via Command Line (Linux OS)
To generate SSH keys, run:
ssh-keygen -t rsa -b 4096
You will then be prompted to specify a file in which to save the key:
Enter file in which to save the key (/home/username/.ssh/id_rsa):
Next, you'll be asked for a passphrase:
Enter passphrase (empty for no passphrase):
While a passphrase is optional, it's highly recommended for added security. Without it, your private key will be stored unencrypted on your computer. Choose a strong passphrase to secure your private key.
You will receive a confirmation message indicating where your keys have been saved:
Your identification has been saved in /home/username/.ssh/id_rsa.
Your public key has been saved in /home/username/.ssh/id_rsa.pub.
The key fingerprint is:
4d:23:69:6a:7a:39:12:a2:eb:bb:d6:78:66:2a:64:a9 root@server.hostname
Generating SSH Keys via PuTTY Key Generator (PuTTYgen) (Windows OS)
PuTTYgen is a free tool for generating SSH keys. You can download PuTTYgen and PuTTY client here. Open PuTTYgen, then click "Generate":
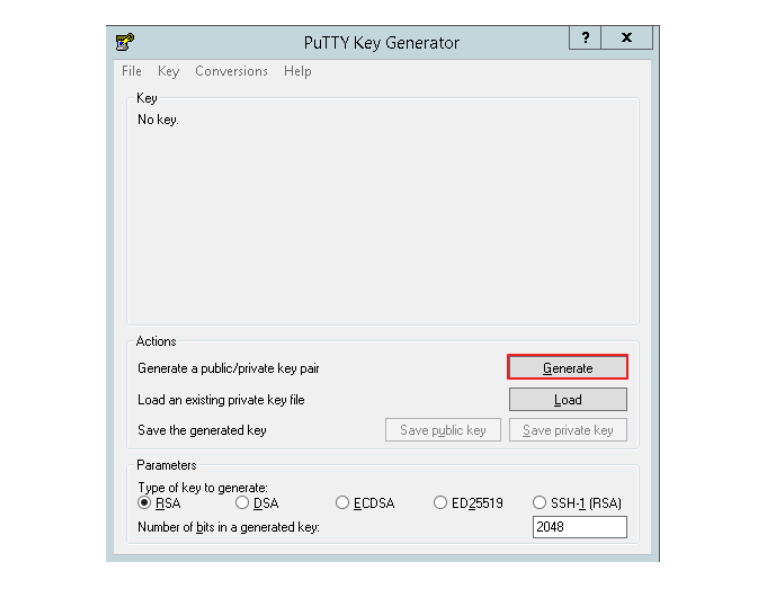
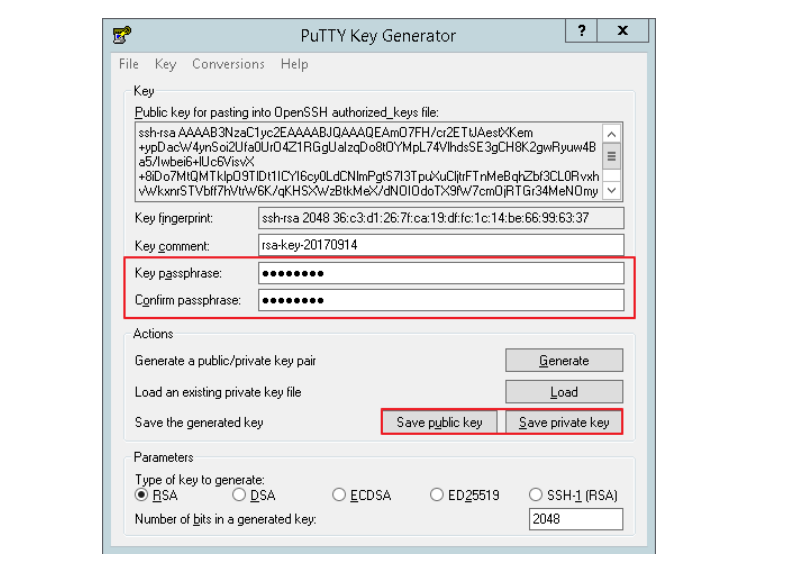
Move your mouse around the window to generate randomness. Once the key is generated, enter a passphrase in the "Key passphrase" and "Confirm passphrase" fields. Again, a passphrase is optional but recommended for security. Without one, your private key will be stored unencrypted.
Click "Save public key" and "Save private key," then name the files and choose a storage location:
2. Setting Up SSH Keys
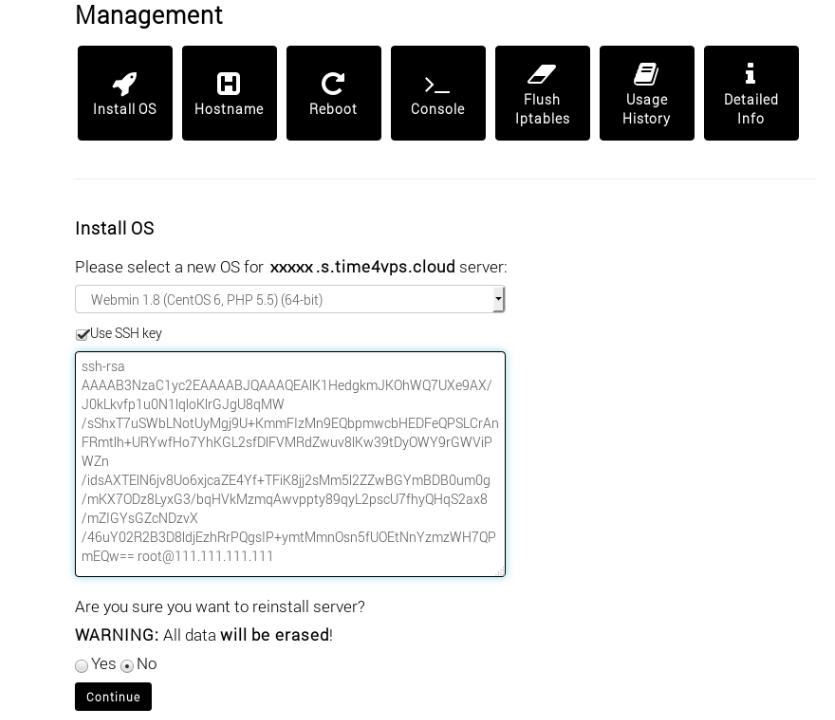
To set up SSH keys on your server, you may need to install or re-install the OS. Open your saved public key file and make the following adjustments:
For Keys Generated via Command Line (Linux OS)
Your key may look like:
ssh-rsa AAAAB3NzaC1yc2EAAAADAQABAAABAQC4H28lnMmxT6c+6KzlNGuUDH7C+bWwyaMpp4gV/iOyX0R/laSeliolW1fxJdVHkLKUL7uewMu+h6RDsjkprFZKP7XEdzxYFRzOKzB541QjIunl33qhd6XLgdc4o0ddJs6RGYaxJJgxYWmBNS+1HKEGWK9uCONRv9CJD/QY/BTaMXfHMMf2FLrYJcIebVPsciz0HngAJ04I/KptGf+ILQQ+kLEeKJJIFRC4Zu0+pbX1niF7oMXXHdvf7xypF8pleDLJzWD92KF7AFlQ+973v/sL2bM5yRPZlX7LcG6GsNdc34Ht2drbmfFEwsN12W7jCEomCIucoXieInxECOI9AUTj root@server.hostname
Change root@server.hostname to root@<server_ip_address>, where <server_ip_address> is your server’s IP address. The updated key should look like:
ssh-rsa AAAAB3NzaC1yc2EAAAADAQABAAABAQC4H28lnMmxT6c+6KzlNGuUDH7C+bWwyaMpp4gV/iOyX0R/laSeliolW1fxJdVHkLKUL7uewMu+h6RDsjkprFZKP7XEdzxYFRzOKzB541QjIunl33qhd6XLgdc4o0ddJs6RGYaxJJgxYWmBNS+1HKEGWK9uCONRv9CJD/QY/BTaMXfHMMf2FLrYJcIebVPsciz0HngAJ04I/KptGf+ILQQ+kLEeKJJIFRC4Zu0+pbX1niF7oMXXHdvf7xypF8pleDLJzWD92KF7AFlQ+973v/sL2bM5yRPZlX7LcG6GsNdc34Ht2drbmfFEwsN12W7jCEomCIucoXieInxECOI9AUTj root@127.0.0.1
Choose the OS from the drop-down list, check "Use SSH key," and paste the public key into the provided field.
For Keys Generated via PuTTYgen (Windows OS)
Your key may look like:
---- BEGIN SSH2 PUBLIC KEY ----
Comment: "rsa-key-20170914"
AAAAB3NzaC1yc2EAAAABJQAAAQEAhdTLlJz6DiY25lj1nmjULToCqbkVideWg3xM
JQa0TEpCxy/IYdmsg6T4thWD0Y42btuKT8x7gKwjlttuRoQPCQomlyCBoVsdM+ax
/U6PxvjWNpVVrk6qXORslLsRU/LvCn2NkfLZiYZGIE3SrcPvQIiYQJ/yZBCJg/7L
OnTkGbzJq9SR+iyAVmL3xduMKx8KOB8Ohk3o6N/1onFizBCnrUAXpN3vh2dCZCPF
nOb+lcjqn8LplFUv205kSJH8kHbRsc8N1QBl0U9UX+Ij72KKq0HyG21lZdF1UF4H
NTyuzaS1luknL6QuhQQ9IcYmedw7BxcIIBkDsorE4cFquU+gjQ==
---- END SSH2 PUBLIC KEY ----
Copy the key between the Comment: "rsa-key-20170914" and ---- END SSH2 PUBLIC KEY ----, removing any new lines or spaces. Paste the public key into the field, and append root@<server_ip_address>, where <server_ip_address> is your server's IP address. The final key should look like:
ssh-rsa AAAAB3NzaC1yc2EAAAABJQAAAQEAlnlhLnzD3+8yEYQoO724H86b/zjHEJWNy/W8AEYsQTCnkhY2lC+O6lVjBI3Fssr4cTNTZ6H+Yh0nbqUdBoYJjkXjAMHVNDo0FYJH5Urgq6OeV3EaxZeuQxcSTzSU4zXBB2SlQ5ZYNGsEGW71nnXPWB4ji8dbJTyodiMlcR/1GuW2d8cPNXUj/gk381NypSvdLF9T4XNAOfQWtFR13wg/YtgnIM1m3jjbtoLo1GKgau68NEp5oQVOMHWQC7/cHqJaWWsbEt/lQjr9wUoMIjjwzThJlWwF86rNVRkz+ORBDyoDioFTXcOSe93hy2Hm4ow8F2kDqlS+05v/qShOTiKWWw== root@127.0.0.1
3. Connecting to the Server with SSH Keys
Connecting via PuTTY (Windows OS)
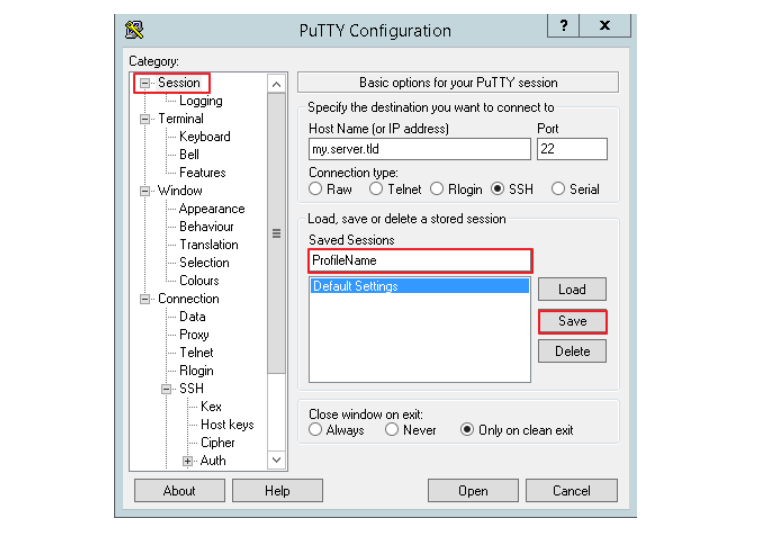
Creating and saving a PuTTY profile makes connecting easier. Open PuTTY, enter your server’s hostname or IP address in the "Host Name (or IP address)" field. Set the port for SSH (default is 22) and select SSH as the connection type:
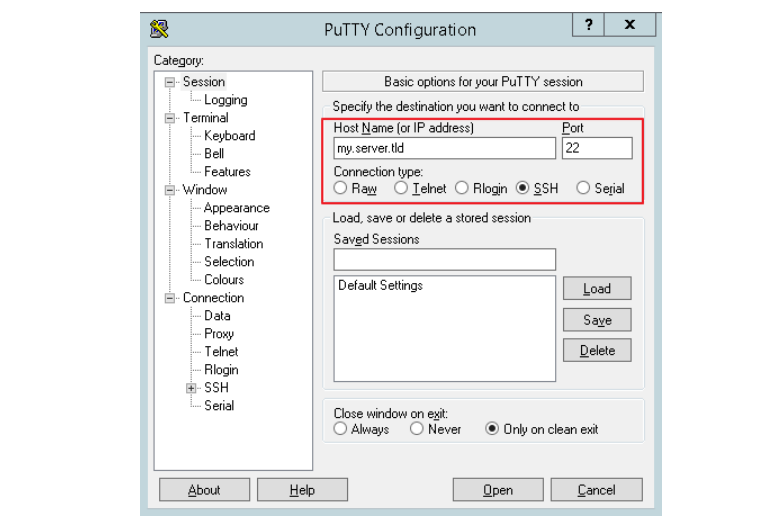
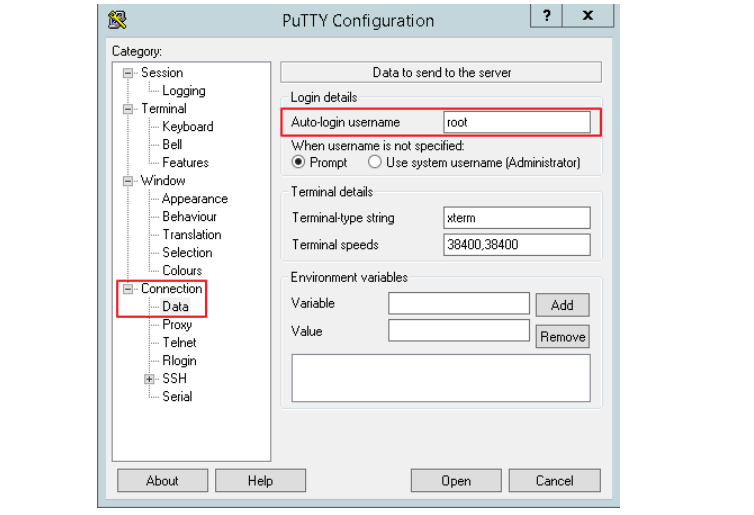
On the left-hand side, go to "Data" under "Connection," and enter "root" in the "Auto-login username" field.
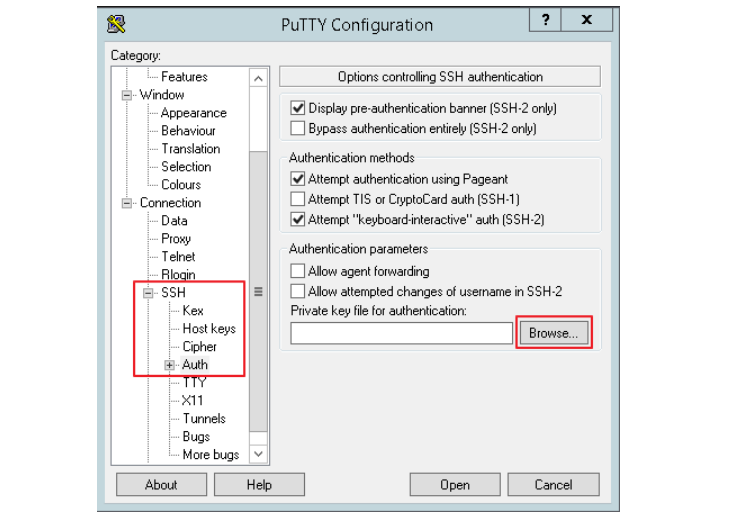
Expand "SSH" under "Connection" and select "Auth." Click "Browse" and choose your private key.
Select the "Session" category, enter a profile name in the "Saved Sessions" field, and click "Save":
To log in, select your saved profile from the list and click "Open." You won’t need to enter a password, but if you set a passphrase, you will be prompted for it at each login.
Connecting via Command Line (Linux OS)
Create a ~/.ssh/config file and add your key and server details:
Host shortcut
HostName serverIPAddress
User root
IdentityFile /home/username/.ssh/id_rsa
Host: Shortcut name for server connection
HostName: IP address of the server
User: root
IdentityFile: Full path to your private key
Once the ~/.ssh/config file is created, connect to your server using:
ssh shortcut
You won’t need a password, but if you set a passphrase, you will be asked for it upon each login.