Secure Your Website with Let’s Encrypt on DirectAdmin

Let’s Encrypt is a free, automated, and open certificate authority (CA) that provides SSL/TLS certificates for public benefit. Managed by the Internet Security Research Group (ISRG), Let’s Encrypt makes it easy to secure your websites.
In this tutorial, you'll learn how to use Let’s Encrypt certificates to secure your websites on the "DirectAdmin" control panel.
This guide was created using our "DirectAdmin 1.5 with CentOS 6" template and is intended for use on our self-managed virtual private servers.
Preliminary Requirements:
- "DirectAdmin 1.5 with CentOS 6" template installed on the server.
Step 1: Update the "DirectAdmin" Control Panel
cd /usr/local/directadmin
`wget --no-check-certificate -O update.tar.gz 'https://www.directadmin.com/cgi-bin/daupdate?redirect=ok&uid=XXXX&lid=YYYYY'
Replace XXXX with your Client ID and YYYYY with your License ID, found in the "DirectAdmin" control panel under "Admin Level" > "Licensing / Updates."
tar xvzf update.tar.gz
./directadmin p
cd scripts
./update.sh
service directadmin restart
Step 2: Enable Let’s Encrypt
echo 'letsencrypt=1' >> /usr/local/directadmin/conf/directadmin.conf
echo 'enable_ssl_sni=1' >> /usr/local/directadmin/conf/directadmin.conf
cd /usr/local/directadmin/custombuild/
./build rewrite_confs
Step 3: Install Let’s Encrypt Certificate
Log in to your "DirectAdmin" control panel at the "user level" and select your domain.
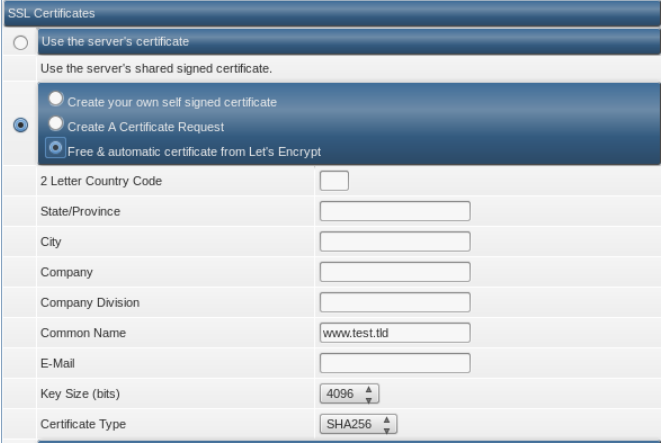
Navigate to the "SSL Certificates" section.
Select "Free & automatic certificate from Let’s Encrypt," fill in the required fields, and press "Save."

Final Steps: Enable SSL on Your Website
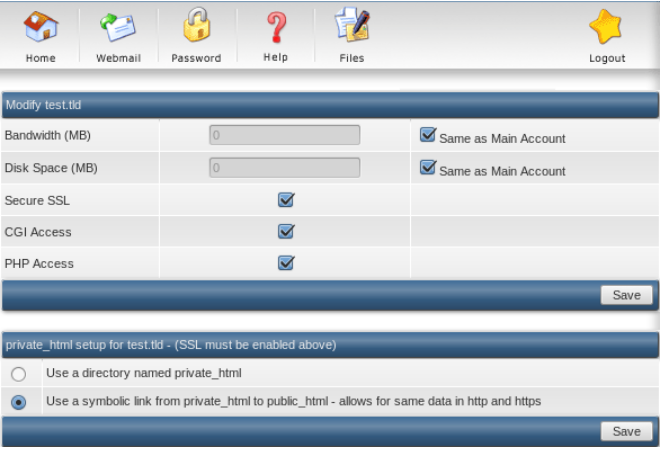
Return to the menu and select "Domain Setup."
Choose the domain for which you installed the certificate.
Check the "Secure SSL" box and press "Save."

If you want the HTTPS protocol to display content from the "public_html" folder, check the "Use a symbolic link from private_html to public_html - allows for same data in http and https" option and press "Save."